Lesson 3Exposure BasicsRemember, click on the wiki if you want to see only the lessons and not the other posts.I'm going to deviate from the order in the wiki a little here, since I'm finding it hard to continue in that order until some basics have been established.
Today I'm going to talk about exposure - the most basic recipe for a picture. Every time you click the shutter, you've made an exposure. What happens is simple: the thing covering the sensor - the shutter - opens up,
exposing the sensor to the light coming through the lens, which is then recorded as an image. When the correct amount of light reaches the sensor - meaning the exposure is correct, the picture looks great. If not enough light hits the sensor, the picture will be too dark, and is considered underexposed, while an overexposed picture will be far too bright, due to too much light being let in.
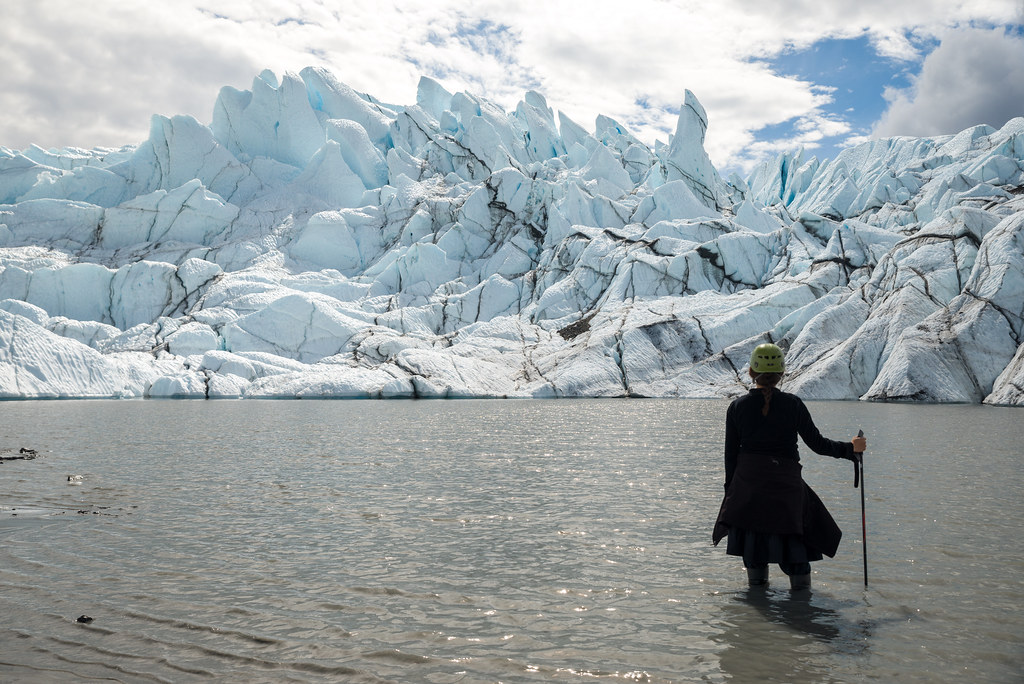
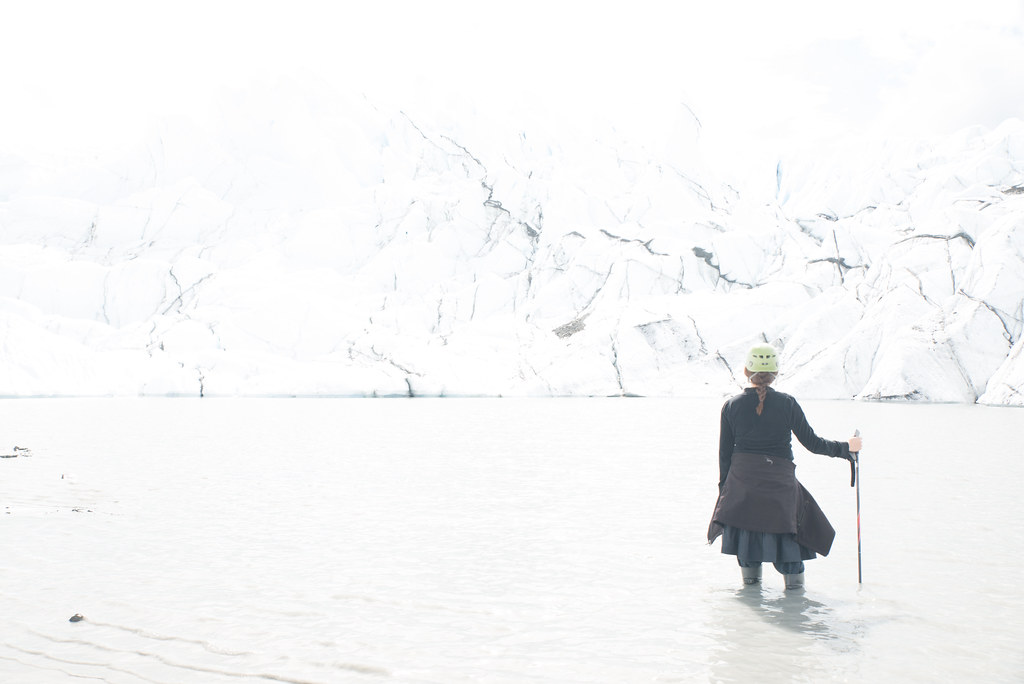
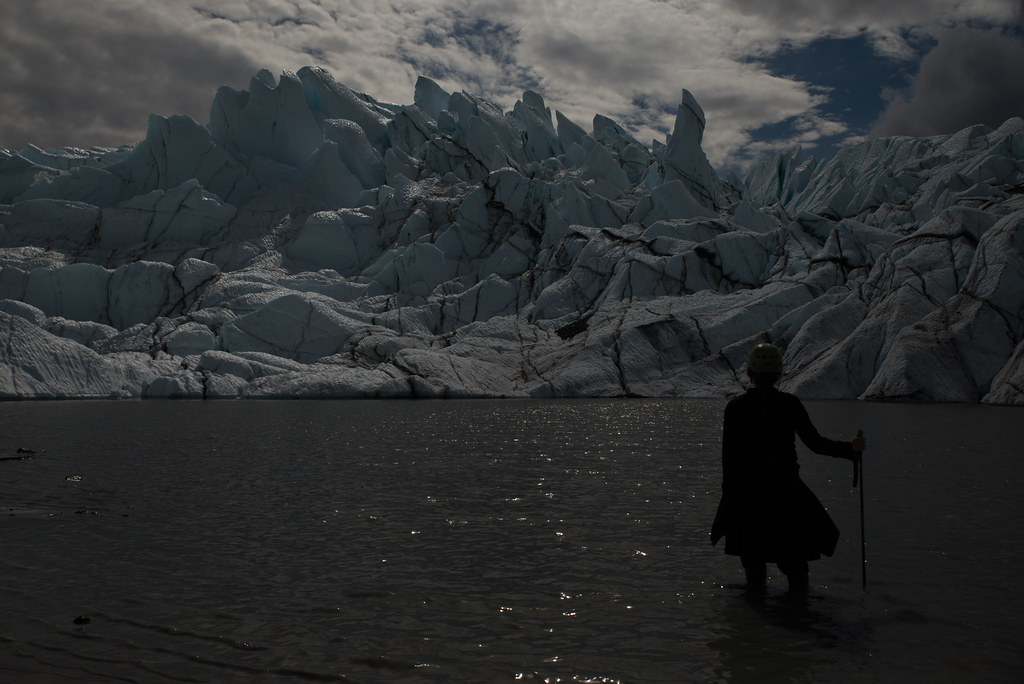
These 3 pictures were taken one after another: the first one is correctly exposed, while the second one is overexposed and the third is underexposed:
There are three things which determine any exposure: shutter speed, aperture, and ISO.
Shutter speed is the time that the shutter covering the sensor is open. The longer it's open, the more light reaches the sensor. Shutter speed is indicated in time (usually in fractions of a second) - i.e. a shutter speed of 1/250 means that the shutter was open for 1/250th of a second.
Aperture, as already discussed, is the size of the lens opening. The larger the opening (lower f/number), the more light gets in.
ISO was also touched upon earlier; the higher the ISO setting, the more sensitive the sensor is to light.
So what does all this mean? Imagine a bucket being filled up with water. You need the perfect balance between the size of the bucket, the diameter of the water pipe, and the length of time the faucet is on. If these are all balanced, the correct amount of water will flow for the correct amount of time and the bucket will be filled correctly. Change any of these, and you end up either thirsty or with a huge mess on your hands.
However, imagine if the pipe was twice the size it needs to be. How do you prevent disaster? You could do two things: double the size of the bucket, or halve the amount of time the water flows. Same goes if the bucket is to small you could either halve the diameter of the pipe or halve the amount of time.
The same applies here to us. If you double your shutter speed (1/250 > 1/125), in order to maintain the same exposure you will need to either halve your ISO (400 > 200), or halve your aperture (f/4 > f/5.6
*). Conversely, if you halve your aperture, you'd have to double your ISO or shutter speed.
*"Wait a minute. Half of 4 is 5.6?! What's Fishy smoking?" Relax - I'm not outta my mind just yet. As discussed in the last lesson, since the f/numbers are a fraction, larger numbers are actually smaller. Now the reason half of 4 isn't, say, 8, is because these numbers define the area
of the open aperture. Happens to be, as far as our math here is concerned, that half the area of f/4 is f/5.6. You're gonna have to trust me on this one.A photographer is on a constant quest for a very simple thing - enough light. Outside on a sunny day light is in plentiful supply and it's no challenge getting it into the camera. But the minute the light starts dropping, say any indoor situation, the camera and photographer have to start making desiccation how to suck every available photon into the lens to achieve a nice exposure. Knowing what we just learned, grabbing more light could be accomplished three ways: a longer shutter speed, a larger aperture, or a higher ISO setting (I'll cover flash and supplemental lighting separately; for now we're talking camera only).
So now the question is, why should you even have to know this? Keeping your camera on Auto results in correct exposures 99% of the time, so why do you have to know the reasoning behind it all? The answer is one word: control. The easiest way of getting your pictures from looking like snapshots to looking like photographs is to leave the security of the Auto mode and venture into the wilds of your mode dial. Nearly all cameras allow you to control these three parameters to a certain extent - some more than others, some easily and some only through backdoor methods and tricks. We'll discuss HOW to change these settings later on, but first let's see WHY you should.
We have to understand that if we have three options available, why does it matter how we balance them? So long as the final result looks good, who cares if it was achieved using a large aperture or a high ISO? The answer is that there's a reason for having three options: each one does something completely different to your picture, and each one has it's own very important limitations.
Understanding what each does and doesn't do is key to taking your photography to the next level.
Aperture: What the aperture
really controls is not the amount of light, but the depth-of-field (DOF) in your image. The fact that it lets through more or less light is just a by-product of this function. DOF is the
amount of in-focus area in any given image. A shallow (or small) DOF is one where only a small part of the picture is in focus, say a portrait. A large DOF, on the other hand, is one where things over a great distance are in focus, such as a landscape.
The following is one the most important photography foundations to remember, so repeat after me:
- The smaller the f/number, the larger the aperture, the smaller the DOF (less in focus), the more light gets in.
- The larger the f/number, the smaller the aperture, the greater the DOF (more in focus), the less light gets in.
Now lather, rinse, and repeat. I'll wait.
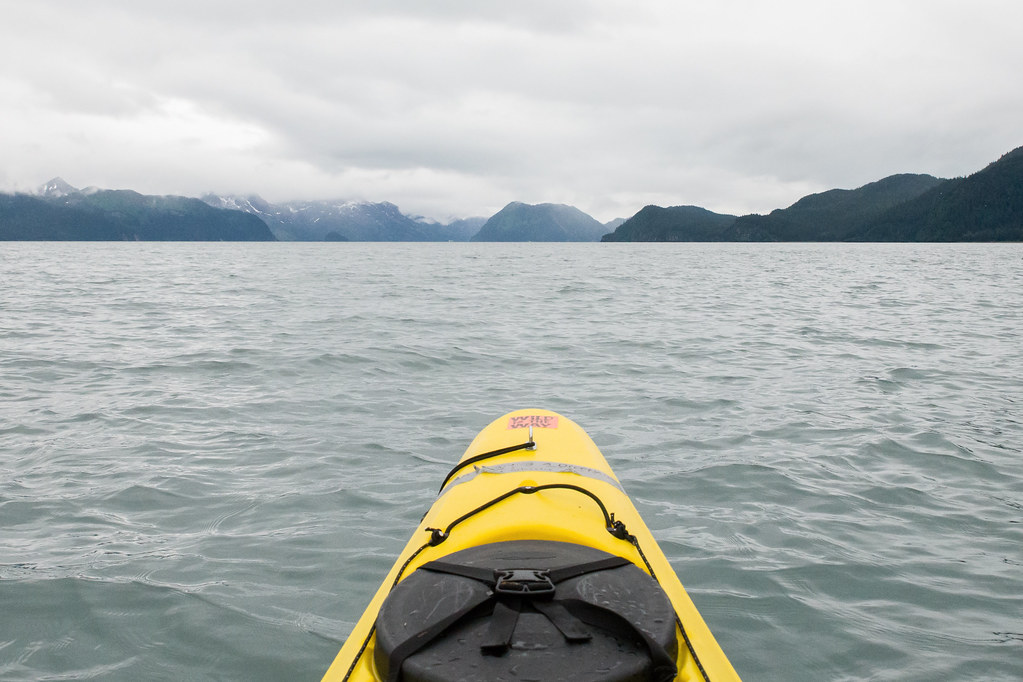
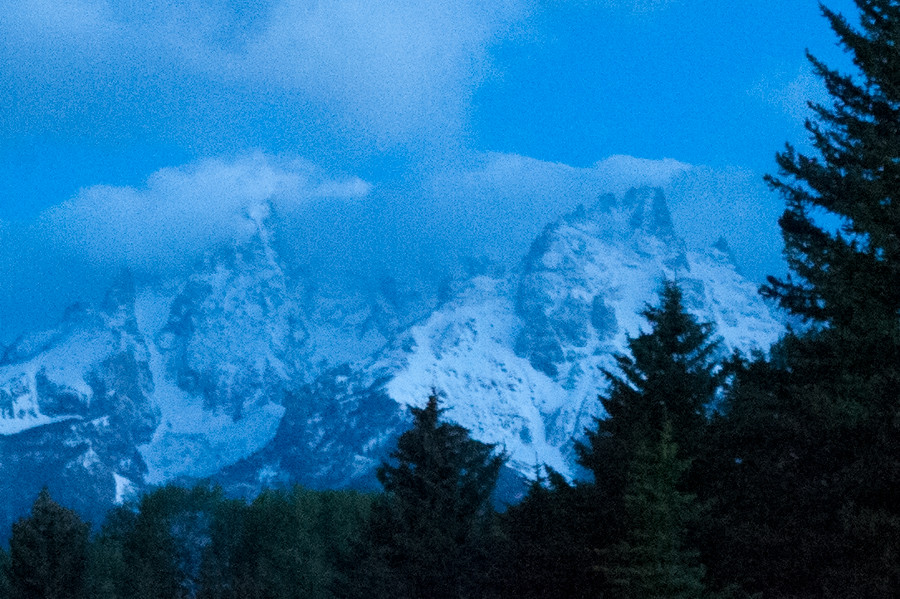
Here we have two pictures which are similar, yet very different. The first picture was taken at f/2.8 - a large aperture. There is a very shallow DOF here: only the bow of the kayak is in focus. Everything else - the mountains, the clouds, even the water a foot away from the boat - is out of focus.
The second picture was taken at f/11 - a moderately small aperture. As you could see, there is a tremendous depth-of-field. Everything from the bow a foot away from the camera to the mountains a mile away is in perfect focus.

So now back to our discussion on exposure: if you need more light, why not just use a larger aperture? Who needs longer shutter speeds or higher ISOs? The answer is because there are some very important tradeoffs:
- If you use a larger aperture, less will be in focus, right? But what if you want everything in focus? What if your shooting a group of people? You can't have only the first row in focus and the others blurry! Suddenly, you can't rely on your aperture to let in the light, since you can't open it too big. That's where your shutter speed and ISO will come into the picture. Not enough light coming in from the aperture? Use a slower shutter! Use a higher ISO!
- Another issue is that large-aperture lenses (f/2.8 and above) are large, heavy, and expensive. Most people simply don't have them or can't afford them.
- And the final problem is physical. Once you've reached your largest aperture, that's it, there's no going further. Using your shutter speed and ISO, you are able to move past that to get more light.
Next up: shutter speed. If you need more light, why not just leave the shutter open as long as needed? The answer is that the speed of the shutter controls the amount of motion in your shot. A fast shutter speed will freeze everything, since only so much movement takes place in 1/4000th of a second. The longer the shutter stays open, the more movement becomes apparent. What this means is that if your shutter stays open a smidgen too long, you will end up with the dreaded
blurry picture.
So if it's too dark and you have to keep your shutter speed low, your options are - say it with me - using a larger aperture or higher ISO.
Keep in mind that a tripod (and Image Stabilization), will enable longer shutter speeds. However, since it eliminates camera movement
only, it does exactly zilch for subject movement. Sometimes there is no choice other than using a fast shutter speed.
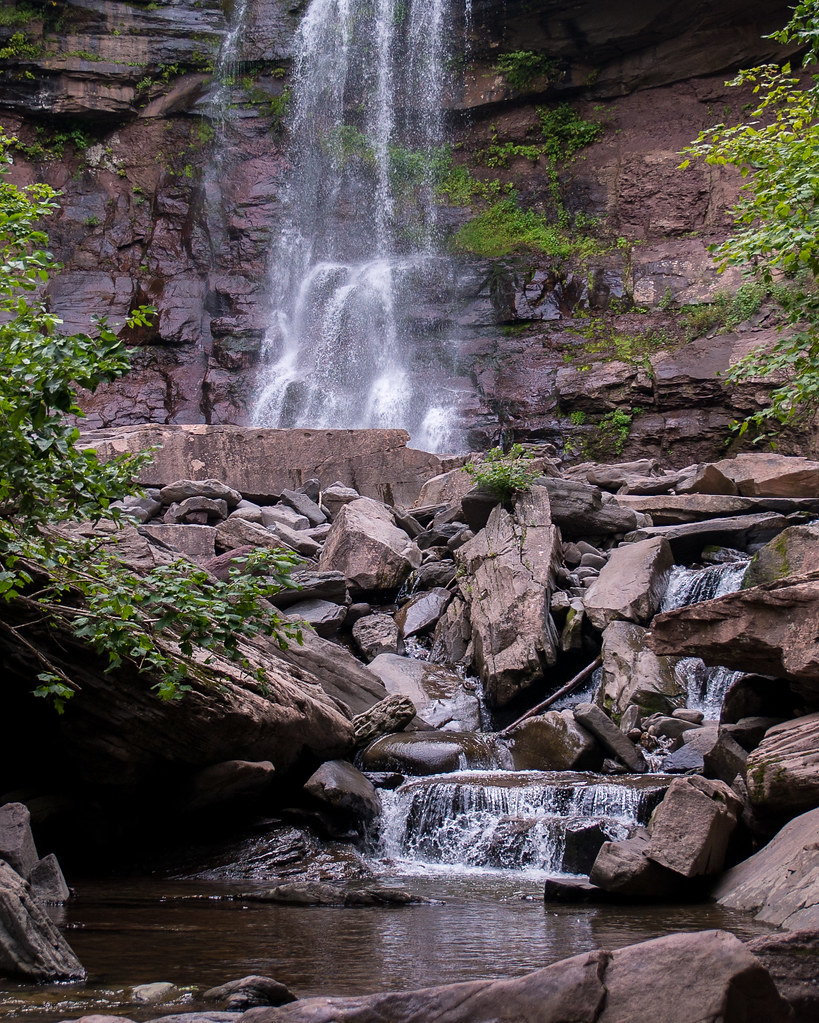
Here we have three different effects caused by varying the shutter speed, where you could clearly see all this.
The first picture used a fast shutter (1/250th of a second), so everything is frozen in place. The rocks are perfectly sharp, and the water has been frozen in mid-drop.
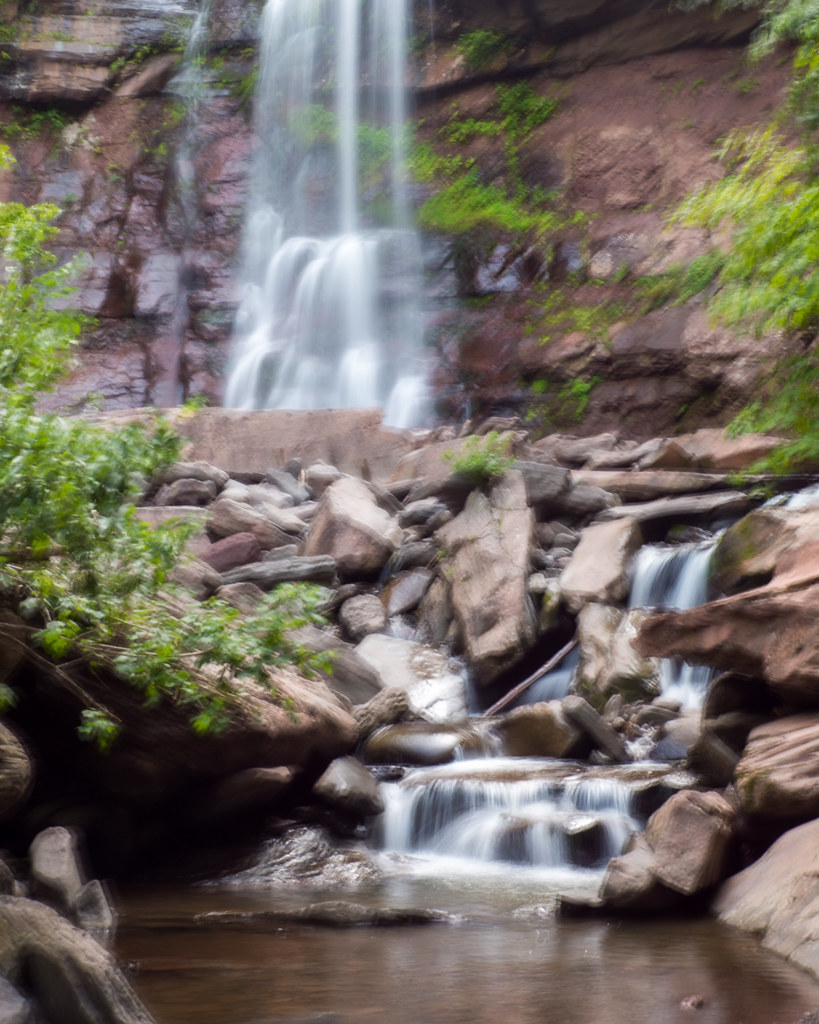
Next, we have a classic example of a blurry picture - the shutter was too slow, so everything is completely blurred.
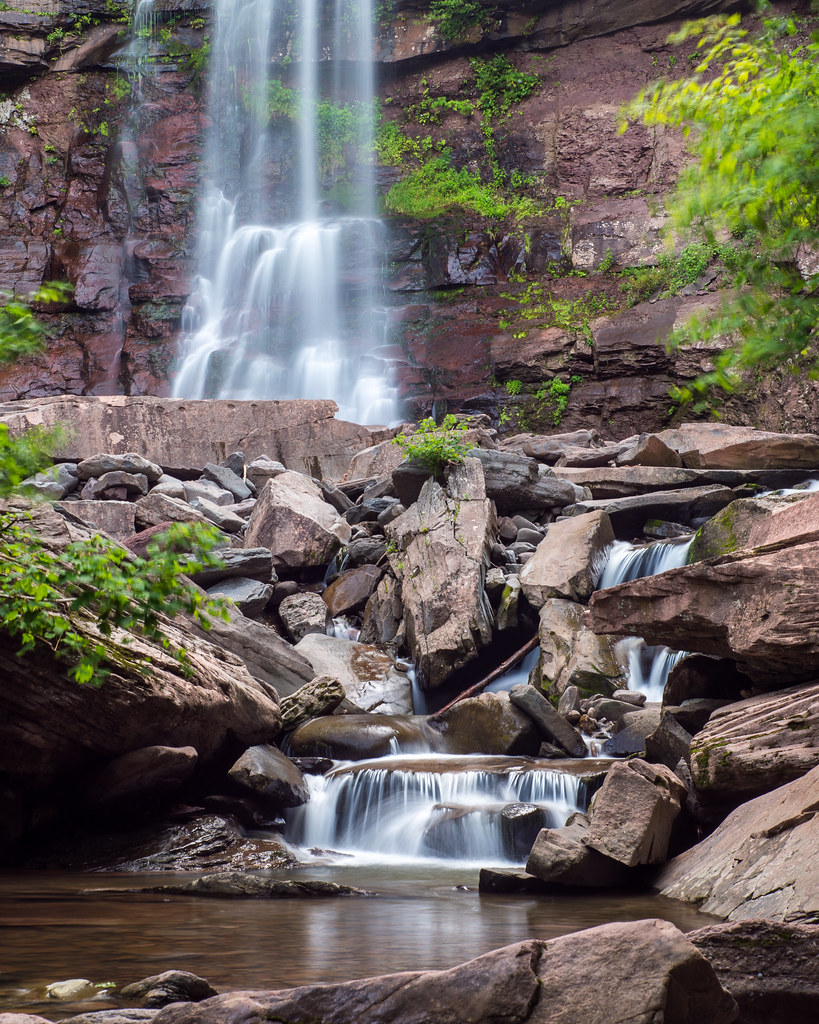
For the final picture, I kept the slow shutter speed (2 seconds), but used a tripod. This illustrates how a tripod only compensates for
camera movement - since the camera was completely steady, and the rocks of course didn't move, they are perfectly sharp. Everything that moves, however, is blurry. In the water this is a desirable effect, as it renders the waterfalls as beautiful ribbons of silky water. Note though how the wind caused the tree on the right-hand side to blur, too.
 And then we have ISO.
 As discussed in the last lesson, the higher the ISO, the more noise in the picture. To keep a perfectly sharp and clean picture the ISO should be as low as possible. That's why when you need more light, you may have to go back to your aperture or shutter speed.
These two pictures (taken from the last lesson) show the clear difference between a low ISO (400), low noise picture (top) and a high ISO (8000), high noise picture (bottom):

The newer and more expensive a camera is (generally speaking), the higher ISO you could use without showing too much noise. A 5-year old camera for example may have enough noise at ISO 400 to be unusable, while a modern full-frame camera could go to ISO 3200 and stay clean. Same goes for larger sensors - the large the sensor, the more noise it could handle.
Now... Here's the deal:
The camera does not know what it's shooting. How is it supposed to know how much of the scene you want in focus? Whether you're on a tripod or not? Whether your subject is moving or not? The answer is that it doesn't. It will choose an exposure recipe it thinks is most likely to keep it out of trouble, not necessarily one which will result in the prettiest photograph.
However, now that you know how the exposure triangle works, YOU could take control and tell the camera just what you want it to do. For example, most cameras will not normally go above ISO 800 - they'll use a longer shutter speed instead when more light is needed. Now you tell me: what would you rather have - a picture that's completely blurred, or one with lots of noise?
Obviously you'd choose a noisy one - at least it's something, as opposed to a blurry mess. But the camera itself will never make that decision for you. If you move out of Auto mode, however, you'd be able to tell the camera to lay off the shutter speed and instead raise the ISO.
_________
Exposure is measured in
stops - each stop means either double of half the light. For example, if you have a shutter speed of 1/250, a stop up would be 1/125 - double the exposure time, and twice the amount of light. A stop down would be 1/500 - half the exposure time, therefore half the light. The three example picture in the beginning of this lesson are about 3 stops apart - the correctly exposed one is has a shutter speed of 1/640, while the overexposed one is at 1/80 (1/640 > 1/320 > 1/180 > 1/80), and the underexposed one is at 1/4000 (1/640 > 1/1000 > 1/2000 > 1/4000 (at 1/1000 and above most cameras start rounding the numbers)).
Let's imagine a scenario for a moment. You're taking pictures of your 2-year old. It's nighttime, and there's not too bright in your living room. Half your pictures are coming out blurry, since he's running around in circles nonstop. You check your camera and see that your aperture is maxed out - let's say f/3.5. Nothing you could do about that, as it ain't gettin' any bigger. Your ISO is at 400, and the shutter speed is at 1/60. Do you:
a) Throw the kid in the bath, where he has to sit (fairly) still
b) Resolve to never again let him eat an entire package of gummy bears right before bedtime
c) Try to get your shutter speed fast enough to actually freeze him and get a sharp picture.
If you answered a or b then great, it's past his bedtime anyway. But if you want to get a decent picture, you do c. Since you can't make your aperture larger, how are you gonna get the light you need? Use a longer shutter speed? Definitely not, that'll just make everything blurrier. So you want to raise your ISO - but how much? Sure, you could do trial and error, but there's a simpler way. Knowing that if we cut our shutter speed in half, we'd have twice the chance of a sharp picture, the first thing you should is
re-balance your triangle. Since doubling your shutter speed will result in half as much light, doubling your ISO form 400 to 800 will compensate for that! Now that your sensor is twice as sensitive to light, the picture will look the same even now that the shutter speed was halved. You lost a stop of exposure with your shutter, but you gained a stop through your ISO.
Look carefully at the following exposures and you'll see that at the end of the day the exposure will be identical. You would choose one over the other based on your need for that particular photograph, as far as DOF, motion, noise, etc.:
f/4, 1/60, ISO 400
f/5.6, 1/30, ISO 400
f/11, 1/15, ISO 800
In the second example, we lost one stop of light by using a smaller aperture, but we gained it back by adding one more stop of shutter speed. In the third example, we lost a full three stops from the first, but we gained it back by adding two stops of shutter speed (1/60 > 1/30 > 1/15) and one stop of ISO.
With this information in hand you will be able to control exactly how and when your camera chooses one setting over the other, and will be able to make your own creative decisions. In the next lesson we'll discuss exposure modes - the options and controls that make all this choosing possible.
___________
Lesson Summary: - The most basic part of taking a picture is exposure - making sure that the right amount of light reaches the sensor.
- Exposure is the correct balance between aperture size, shutter speed, and ISO level.
Aperture:- The aperture is the size of the lens opening. It determines how much is in focus (depth of field) and how much light is let in at any given time.
- The smaller the f/number, the larger the aperture, the smaller the DOF (less in focus), the more light gets in.
- The larger the f/number, the smaller the aperture, the greater the DOF (more in focus), the less light gets in.
- The limitations are the physical maximum, and the required DOF.
Shutter speed:- Determines the time that the sensor is exposed to light and the level of motion in the picture.
- A fast shutter speed (low fraction of a second) lets in less light and freezes motion.
- A slow or long shutter speed (a large portion of a second, or longer) lets in more light and shows motion.
- The limitations are the requirements for a sharp picture. Too long a shutter speed and camera and/or subject motion is recorded as a blur.
ISO- Determines the sensitivity of the sensor to light.
- A higher ISO level lets the sensor absorb more light, but creates noise.
- A lower ISO level lets in less light but does not create noise.
- Better and newer sensors handle high noise levels much better.
- Limitations are the acceptable levels of noise and image degradation.
- If you change one of these parameters and want to keep the same exposure, you will have to compensate by adjusting one of the others.
- Knowing all this will allow you to take creative control of how your image will come out, as opposed to leaving it all at the mercy of your camera.
 Topic Wiki
 Poll
Poll
 Topic: Learn Photography Master Thread (Read 360847 times)